
*This website contains affiliate links. If you click on these and make a purchase, we will receive a small percentage of the sale.
Proxychains is a great tool to have on your PC, either if you plan on using it or not. If you plan on using Beagle Scraper for e-commerce scraping, you will need proxychains – with public or private proxies – to direct your requests through various IPs. In this way, you will avoid getting your machine’s IP banned by the target website(s).
In this article, you will learn
- Why proxychains is better with private proxies
- Windows alternatives to proxychains
- How to install proxychains
- How to setup proxychains [the complete config file at the end of this article]
- How to use proxychains
Why proxychains is better with private proxies
I don’t try to brag the benefits of using private proxies over public ones, but here’s a list with three reasons why you should consider private proxies over public ones:
- 99.99% uptime – your IPs are always available for use
- High speed – you are the sole users of these proxies, so you don’t share the server’s speed and bandwidth with hundreds of other users
- clean IPs – with private proxies you are guaranteed the IPs will connect to any website
For scraping, I recommend you look into SEO proxies, these are cheaper proxies and you get more IPs for your budget.
Windows alternatives to proxychains
Proxychains support only Unix based systems. If you have a Windows PC and you need to do your scraping from it, you have two options.
1. Use Proxyfier
Proxyfier does the same job – on a Windows PC – as Proxychains does on a Linux or Mac. However, Proxyfier is a paid tool and there is a small fee that you will need to pay for using it.
2. Virtual Box with a virtual machine
The free alternative to Proxyfier is to use VirtualBox and create a virtual Linux machine on your PC. You’ll need to install VirtualBox, create a Linux image and use proxychains inside it. Have a look at this setup, installing VirtualBox is easy and there are plenty of tutorials on how to create your little virtual machine.
How to install proxychains
Proxychains is an open-source project and you can download the source code from GitHub, here. However, if you just plan on using proxychains for scraping or any other low-security web automation or browsing projects, there is no need to read the source code or any documentation.
All you have to do is to first install it and then set it up.
Installing on Mac with homebrew
$ brew install proxychains
Installing on Ubuntu or any other Linux Distro with apt-get
$ sudo apt-get install proxychains
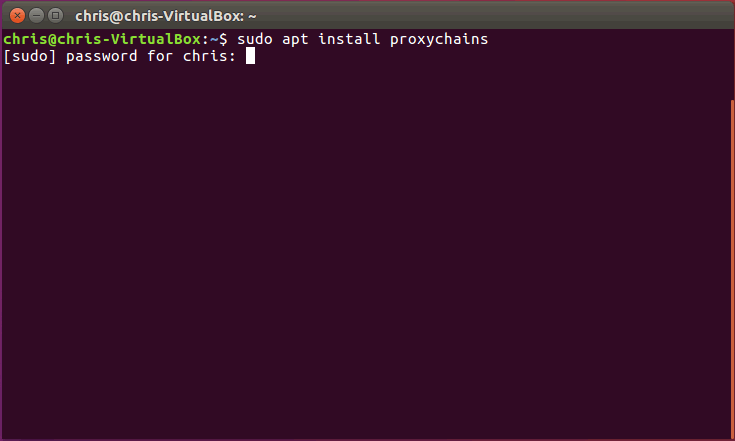
That’s all! Proxychains is now installed on your PC. Next, right after the installation, before using proxychains, you will need to setup the config file and insert your proxies IPs and login details.
Setup proxychains and your proxies’ details
To setup proxychains, you will need to access the config file, comment/uncomment a couple of lines and paste your public or private proxies’ IPs, ports and login details.
Access the config file
After installing, use the same terminal to access the config file.
For Ubuntu, I will use nano with root access because the /etc/ folder is restricted for editing by normal users. The command used in the terminal is:
$ sudo nano /etc/proxychains.conf
Mac users can use Vi to access the config file, by using the following command:
$ vi /usr/local/etc/proxychains.conf
Voila! Now proxychains’ config file is opened in the terminal. Next, you will have to comment and uncomment some lines to setup proxychains.
First, you need to comment strict_chain. All you have to do is to put a # (number sign) in front of strict_chain.
Second, you will need to uncomment random_chain. by removing the # from the line. And your config file should look like this.
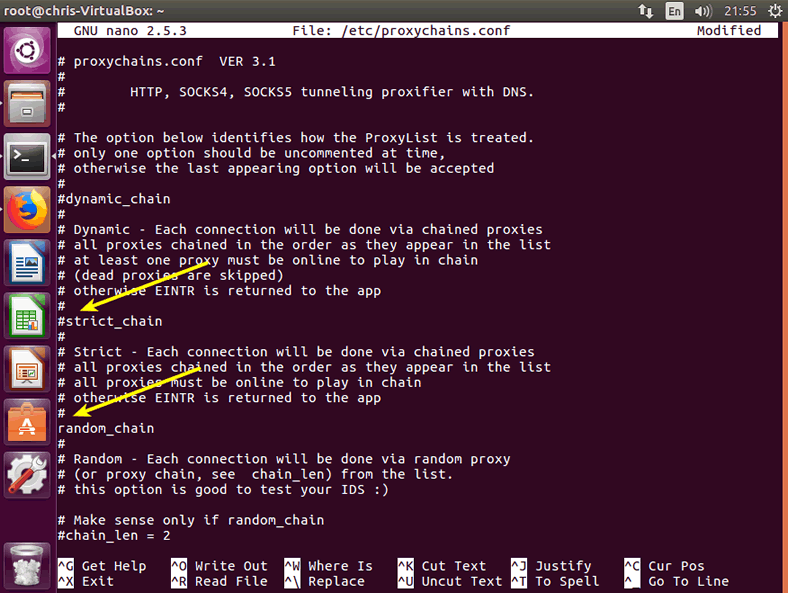
By now, I think you know what these two lines are doing to proxychains. Simply put, you told proxychains to not use your proxies’ IPs in strict order (strict_chain) but to randomly rotate them when making connections (random_chains). In other words, you instructed proxychains to connect like Tor and randomly use your IPs.
Watch for the DNS setup! Although proxychains comes with the proxy_dns uncomment, make sure it is uncommented. In this way, you will avoid any DNS leaks that could disclose your real IP.
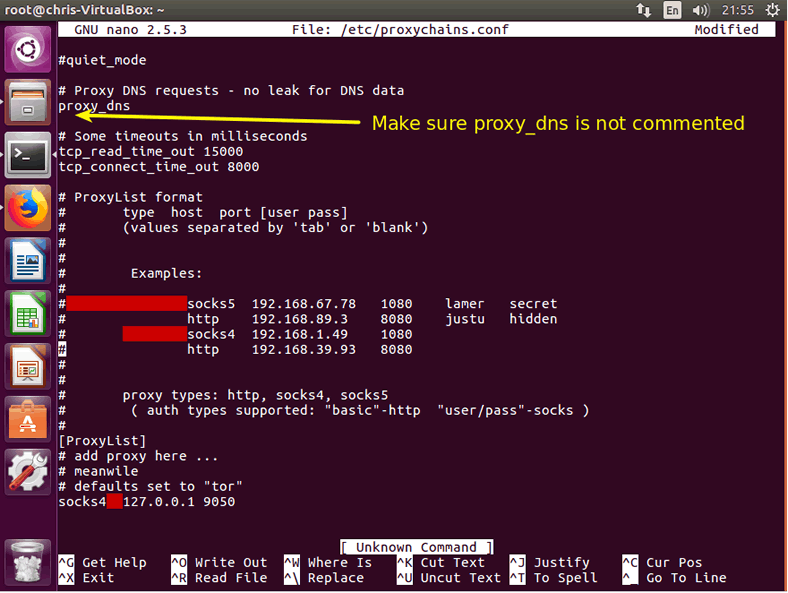
Setup proxy IPs
The final part of setting up proxychains is to pass it your proxies’ details. First, before starting, make sure you delete or uncomment the default socks4 127.0.0.1 9050 line. You won’t need it if you are going to use your own proxies’ IPs.
Afterward, insert each proxy’s details on a separate line, precisely as it shows it the proxychains config file example or as this format: proxy_type ip port user login
http 123.45.67.89 4416 chris password
You can add as many IPs as you have. The more IPs you have, the better, because proxychains will loop through them and use each IP less often.
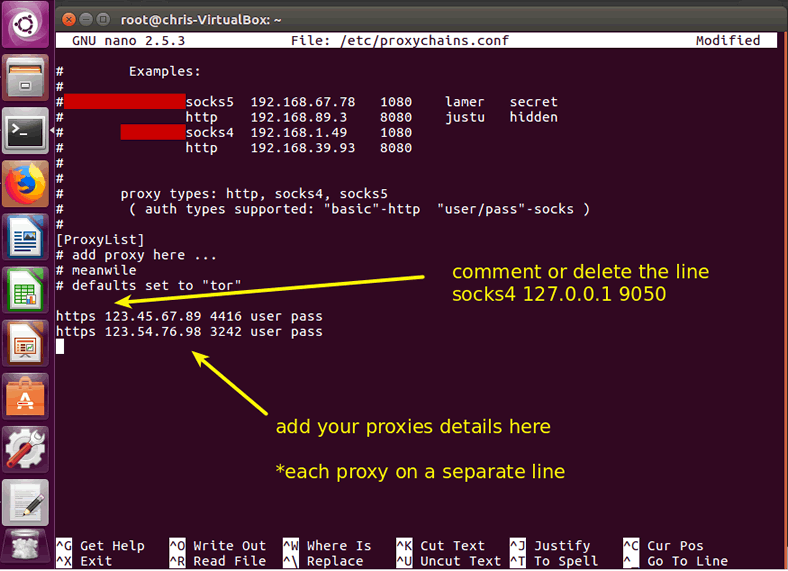
Note: You can even mix public and private proxies. To start, I recommend a private/public ratio of 1/1. Meaning that for each private proxy, try to use one public proxy as well. Thus, if you have 20 private proxies, you can get 20 public ones and save them in your proxychains IPs lists. Make sure the free ones are working and that you do not pass the username and password of your private ones to them (public proxies only require their type, IP and port).
You can find my proxychains config file at the end of this article. Copy it, insert your proxies details and paste it over your default proxychains config file.
How to use proxychains for browsing or scripts
To use proxychains, all you need to do is to pass the proxychains command in a terminal, before the actual app’ name you plan on using. The format is
$ proxychains app_name
Proxychains with Beagle Scraper
To divert your scraping requests through proxychains, all you need to do is to navigate in the folder where you have downloaded Beagle Scraper and pass this command in the terminal:
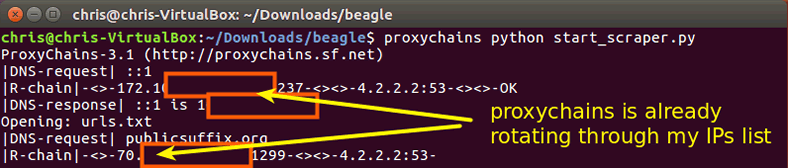
$ proxychains python start_scraper.py
This command instructs proxychains to start proxychains and divert all requests for Beagle Scraper.
Proxychains with web browser
If you want to browse through your newly tor-like proxychains setup, all you have to do is to open a terminal and pass the command for instructing proxychains to divert the browser’s requests through your proxies’ IPs. Let’s use Mozilla Firefox with proxychains by passing this command in a terminal:
$ proxychains firefox

To wrap up
There are only a few simple steps required to setup proxychains for Beagle Scraper, web browsing or for any other script or app you plan on diverting its requests through multiple IPs.
Here’s the complete proxychains config file
# proxychains.conf  VER 3.1
#
#        HTTP, SOCKS4, SOCKS5 tunneling proxifier with DNS.
#

# The option below identifies how the ProxyList is treated.
# only one option should be uncommented at time,
# otherwise the last appearing option will be accepted
#
#dynamic_chain
#
# Dynamic - Each connection will be done via chained proxies
# all proxies chained in the order as they appear in the list
# at least one proxy must be online to play in chain
# (dead proxies are skipped)
# otherwise EINTR is returned to the app
#
#strict_chain
#
# Strict - Each connection will be done via chained proxies
# all proxies chained in the order as they appear in the list
# all proxies must be online to play in chain
# otherwise EINTR is returned to the app
#
random_chain
#
# Random - Each connection will be done via random proxy
# (or proxy chain, see  chain_len) from the list.
# this option is good to test your IDS :)

# Make sense only if random_chain
#chain_len = 2

# Quiet mode (no output from library)
#quiet_mode

# Proxy DNS requests - no leak for DNS data
proxy_dns

# Some timeouts in milliseconds
tcp_read_time_out 15000
tcp_connect_time_out 8000

# ProxyList format
#       type  host  port [user pass]
#       (values separated by 'tab' or 'blank')
#
#
#        Examples:
#
#            	socks5	192.168.67.78	1080	lamer	secret
#		http	192.168.89.3	8080	justu	hidden
#	 	socks4	192.168.1.49	1080
#	        http	192.168.39.93	8080
#
#
#       proxy types: http, socks4, socks5
#        ( auth types supported: "basic"-http  "user/pass"-socks )
#
[ProxyList]
# add proxy here ...
# meanwile
# defaults set to "tor"
#socks4 	127.0.0.1 9050

http 123.123.204.127 21237 username password
http 123.235.94.23 21263 username password
http 123.82.147.180 21267 username password


i’ve got a few questions; why did you use ‘username’ and ‘password’ when putting in your proxy? Also, do you have a virtual machine for windows you recommend?
HI RG,
1. Password: I used private proxies with user:pass authentication and without it, the proxy server doesn’t know I have to right to use it and won’t allow access. If your proxy doesn’t have user:pass auth, but only IP whitelisting (or not auth whatsoever), then you don’t need to specify any user or pass.
2. a Virtual machine with Windows as a host? Sure, I recommend VMware Workstation 15 Player, which is better (imo) than VirtualBox. Here’s the product here: https://www.vmware.com/products/workstation-player/workstation-player-evaluation.html
Alternatively, you can get an ultra-cheap VPS and use it instead a Virtual machine.
Thanks Chris. I appreciate the help a lot. I’ve got another set of questions – hoping you can help again.
I’m using the Gather Proxy 9.0 to find proxies i can use to put into the proxychains file you have above. I put in about 10 and then went to test it out with firefox. After i input everything, i ran proxychains firefox and got this back:
error: no DISPLAY environment variable specified
web search yielded no results. you have any idea?
Hi RG,
This error is caused by your system. Check this link for more info: https://askubuntu.com/questions/417111/open-firefox-from-bash-file-error-no-display-specified
I can’t use host.domain.com as IP -_-